Wednesday 28 October 2020

Spangles on antique lace bobbins

Spangles are the circles of beads attached to the end of English East Midlands style lace bobbins. Their function is to add weight to the bobbin, to provide tension for the thread, and to prevent the bobbin rolling on the pillow. The most common type of bead in nineteenth century spangles is the square cut glass bead. In an interview with The Bedfordshire Times in 1912, Robert Haskins the bobbin maker explains that they were made by melting a piece from a stick of glass on a copper wire, which made the central hole, and then pressing the sides with a file which caused the markings on the bead and its square shape. Eye beads were also popular and some can be seen in the image above. These were round beads with spots of colour added to their surface to give the appearance of eyes. The most well-known were Kitty Fisher beads celebrating the famous actress, with blue and red dots representing her mouth and eyes. Beads were not the only objects on spangles however, many of them incorporated seashells, coins, buttons and beads that would have had a personal meaning to the lacemaker.

Wednesday 21 October 2020

#MeToo doily bobbin lace


As you can see my new bobbin lace doily is underway. The idea of using a tape lace construction was that I would need fewer bobbins and I wanted to see if it was a quicker way of working. Well that hasn’t been the case so far, mainly because I’ve started at the most difficult place where I’m incorporating the text #MeToo into the design. However working the grid filling has been interesting as I’ve only needed two pairs of bobbins for the entire thing, as they just work up and down there are no four plait crossings as there would be in Bedfordshire lace, which is the style I’m most used to. Instead of crossings, one of the pairs is hitched under the previously worked plait and the other pair linked through it to make a join. The books about tape lace suggest only one thread need be hitched under but I found that didn’t make a neat join and using a pair works better for me. It’s also a learning curve trying to work out the right length for each plait in the filling when you complete the ‘crossing’ on the following row, I think I’m getting the hang of the tension but I find four plait crossings easier. I guess it’s just what you’re used to! I wanted the text on the mat to stand out so I gave up attempts to include the text in cursive script and I’m using Bedfordshire style techniques to work it, hence the increased number of bobbins. Once the text is finished I should be down to a handful of bobbins for the outer mat though. It’s certainly an interesting way of working and great to be learning some new techniques.

Wednesday 14 October 2020

Troubled love lives in lace bobbins

I’ve been winding bobbins for my latest bobbin lace project – the mat I’ve been designing in tape lace, which I’ll blog about once the lace is underway – and I came across these three bobbins about troubled love lives. They are inscribed with Love don’t forsake me; Let no false lover gaine my hart 1842; and Its hard to love and canot be love again. One poor lacemaker is trying to hang on to her boyfriend, while the other two have clearly had romance problems in the past. The one who doesn’t want a ‘false lover’ suggests she’s had one in the past who cheated on her. While the last one implies she’s found a boy she likes but he’s not interested or that she too is having problems getting back into a relationship. At least it shows that these problems did not start with social media – they’ve been going on for centuries! In fact T L Huetson in his book on Lace and bobbins records one with the inscription ‘Place no confidence in young men’ – a warning that any young girl would be wise to bear in mind! I think the first bobbin on the left was made by Bobbin Brown of Cranfield, the middle one was probably made by Jesse Compton and the one on the right is probably by David Haskins who came from a family of bobbin makers.

Wednesday 7 October 2020

Lace pattern designing

I’ve decided to continue my series of subversive lace mats with a message. The first one was made in Bedfordshire style lace and had ‘get off me’ worked into the lace. It’s been exhibited in many places and always draws interest so I thought I’d make a series of them which could be shown together. However, this time, as I’ve become interested in Russian tape lace, I’ve decided to use that style for the new mat. I’ve never made that type of lace before so it’s a bit of a leap in the dark and my piece will definitely be in the ‘style’ of Russian lace rather than being a model example!

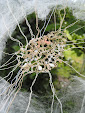
I’ve found Bridget Cook’s book ‘Russian lace making’ to be very useful and, as you can see from the picture above, I’ve started designing my pattern. The great thing about this type of lace is that if you design the pattern well you can make the entire mat in one go with only a few pairs of bobbins, there is very little tying in and out. I have incorporated what I would call a ninepin edge in part of the design just so I can make it in the Russian style with only two pairs of bobbins! You start working from one edge of the main pattern and work a plait for the lower half of the edging, joining it to the footside as you go, then when you reach the end you turn back and work the top half of the edging, joining into the bottom half as you work until you return to the place you started from – isn’t that clever! That’s the theory anyway, I’ll let you know how it turns out! My main problem at the moment is how to include the text into the central area of the mat and what filling stitch to use. I’m not sure if I can make the text in a continuous line, I may have to work that part as a separate motif and tie into it. It’s definitely a work in progress and I’m learning new things all the time!